
So following the hustle and bustle excitement of planning and executing a wedding, then barreling through the holidays, I began experiencing a gnawing “Let’s find a project” tick in my head. Normal people would want to use that time to relax and unwind from such a stressful year. But not me. I’m a glutton for punishment. And what better way to test the strength of your marriage than to take on a MAJOR home renovation just 2 1/2 months in??
I blame the whole situation on my momma.
For Christmas, she bought me all kinds of new bathroom accessories, just to switch things up. Well once I got all this nice, new stuff in there, it didn’t quite match up with all the old fixtures, outdated walls and ugly tile and it quickly started eating me up, until Tuesday, January 12, I decided it was time to change it. All of it. So I put a little bait out on social media. “Hi friends! Needing some small handy man things done around the house. Nothing major. If you’re professional and do good work hit me up!” That sort of thing. I quickly got several nibbles, one being a friend of mine who had recently fallen on some crap luck and lost his job. He had a background in real estate and had flipped a few houses. Perfect! By that evening he had come by the house so we could discuss. “I just need a few simple things done,” I said flippantly. “All this old, laminate tile stuff taken down, tiling the shower and floor, painting the walls and changing the fixtures.”
“No problemo,” he assured me. “This is a 3-4 day project at most.”
We agreed on an hourly amount to be paid, shook hands and I lulled myself to sleep that night with visions of paint samples dancing in my head.
Day 1: Demo day. And the day my life spiraled into hell.
It is at this point in the story that I should tell you 2 VERY VERY valuable lessons I learned during this process. Num.1-whatever your budget and time frame estimate, go ahead and double that. Hell, go ahead and triple it. Things will go wrong. And Num.2-If you decide to gut a bathroom in your home…MAKE SURE YOU HAVE A BACKUP CRAPPER!! I live in a 1948 bungalow that my grandparents bought in 1972. There is but one bathroom in this house and from what I can tell, a lot of the modern conveniences were never factored in, i.e. The windows in the bathtub, no plumbing for an actual shower head, and outside of the shower it’s a measly 5′ x 6′, so it’s tiny. So if this thing is out of commission for an extended period of time, you are S.O.L. In every sense of the term.
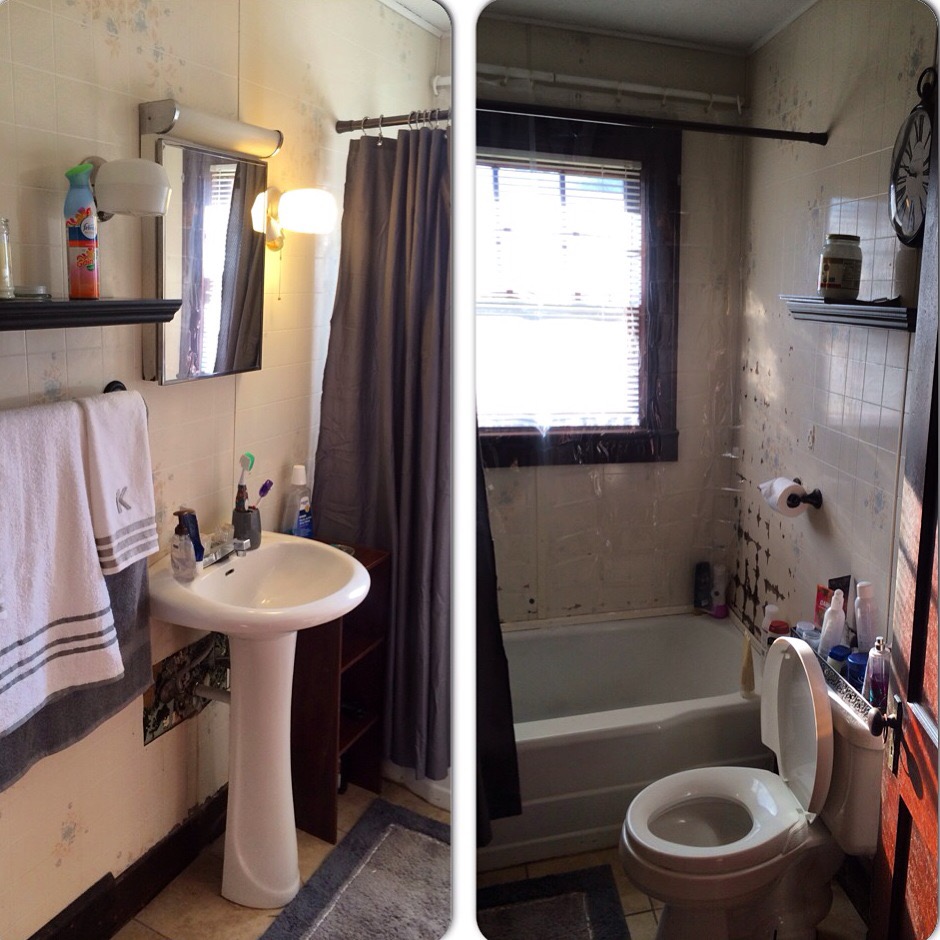
Once we began ripping out all the water works and the fake laminate tile from the walls, a monster was slowly being revealed. A big, ugly monster, untouched for over 40 years, covered in 4 layers of lead based paint and black mold, wrapped nicely under 2″ of liquid nails adhesive.
 Behold, my bathroom. All that orange you see on the walls? That’s liquid nails. And the black you see poking through? That’s black mold. And the hints of sea foam green is just one of the yummy pastels that had previously been painted on the walls.
Alright, well this is the part of the story where we should have just taken the bathroom to the studs and replaced the existing plaster and lathe walls with new drywall. But we needed the black mold gone anyway and I wanted to try and save the original walls. Because I am a dumbass. So for 3 days after work, my husband and I, using razor edge scrapers and gallons of Goof Off and Citristrip, chipped away at the disastrous, disgusting walls.


I fell asleep the second night of construction crying my eyes out, in an apocalyptic fight with my husband. And the worst thing about all of it, is that the mess wasn’t just confined to my bathroom. It was spilling out all over the house. There were tools, and shelves and saws everywhere, a toilet in my dining room and all the dust from drilling and cutting and sanding was being blown into every room in the house due to the vents.
And then it got worse. On what should have been the last day of the project, day 3, we took the toilet out to do the walls and had to leave it out. For 3 whole days. Thank Christ for the creepy shower in my basement, or we really would have been screwed! I literally had to hover over a drain in my basement to pee, and let’s just say nothing will make an already tense situation worse than not being able to take a bowel movement. By the time we had reached the 1 week mark I realized the only thing that had been completed was the shower tile and this project was nowhere close to being finished. And after spending all that time scrubbing and scraping walls, we began to spackle and sadly realized all our hard work was in vain. The walls were too far gone. We were gonna have to hang drywall over it. At this point, I thought about killing our contractor.


So now we have to spend even more time hanging dry wall. After another full day of measuring, cutting and hanging, we had all that up and after hours of scrubbing, there was light at the end of the tunnel. 
But it was like everything else was going wrong. We spent over 3 hours trying to hang the overhead light fixture. Then we couldn’t find screws long enough for the new tub handles. And the toilet sprung a leak. Add to that all the sanding of the drywall mud that was coating everything in my house and I had a full blown meltdown. At day 10 we at least had sealed the grout, gotten the overhead fixture up and painted the walls.

Sigh. By Day 11 we were drawing near the end and we had problems putting the window trim back up. We hadn’t allowed for the 1/4″ trim when we measured for the tile, so all that had to be re-worked. But the other fixture were up and I finally had a sink again so that was good news.
After attempting to put something as simple as the light switch cover back on and being unsuccessful I had meltdown number 3 and I’m fairly certain Mitch was considering an annulment. When we put the drywall up, it added 1/4″ depth to everything on the walls, meaning all my wood trim had to be filed down, and drywall had to be added under the light switch so the screws would reach.
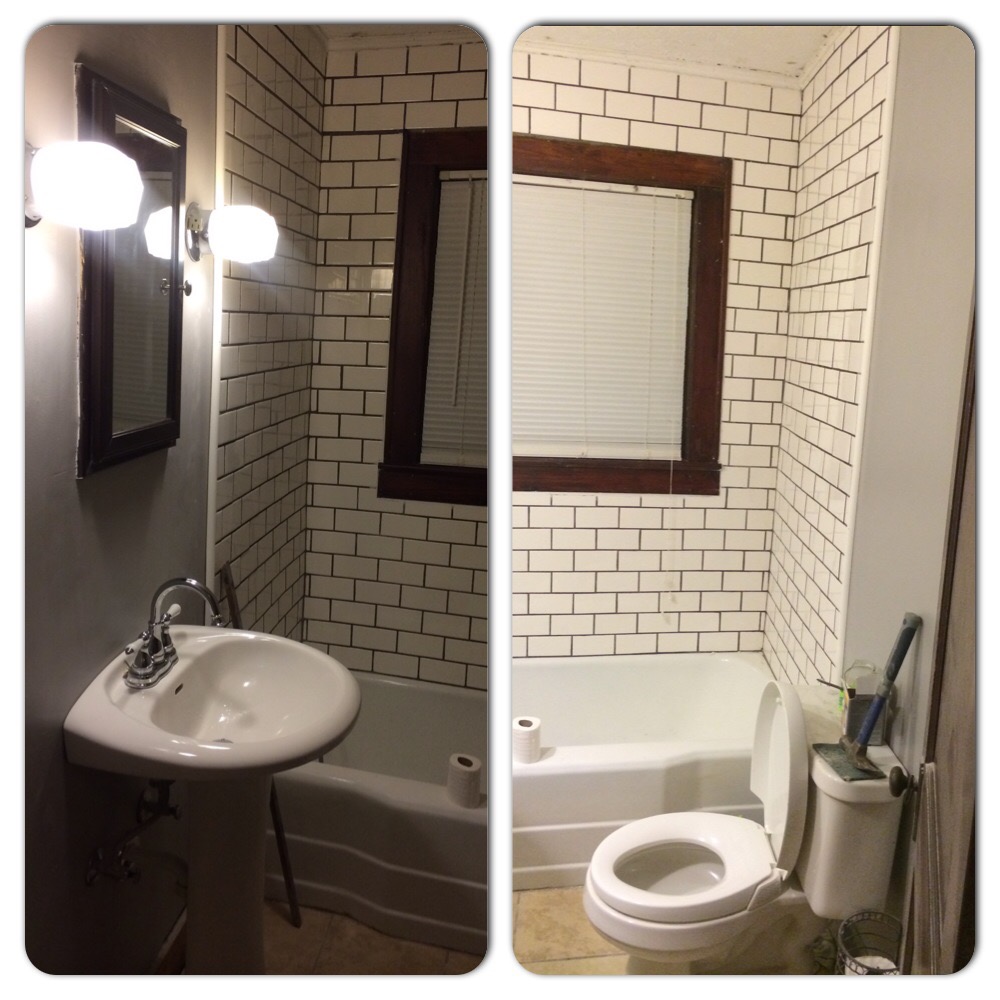
Finally, exactly 2 weeks to the day of beginning this journey, I was able to take my first shower in my new bathroom. Short of the shelves and some hardware, we were finally finished.

Well, except the floors. Due to the unexpected length of time and money, we are going to have to wait to get those done for about another month. After all was said and done, I think my contractor bit off a little more than he could chew, but that’s the thing with these old houses. You never know what you’re getting yourself into until you’re already past the point of no return. He was very reasonable with the cost of labor and after buying all my materials, this bathroom remodel cost me around $1500. I’m probably looking at another $400 for the floors. I love it now that it’s done. But I can never forget the horror we endured those 2 weeks. I’m happy to say I am still married, somehow. And I will hopefully have an updated and final “After” pic within a month.
White subway tile with charcoal grout
All porcelain tipped and chrome hardware
Bombay mahogany min wax stain on woodwork
Behr pure premium paint+primer in “cathedral gray” on the walls
